Stock Photo Gallery

Showing posts with label studio lights. Show all posts

Wednesday, July 18, 2012

When natural light and a reflector can help creating a studio shot


When playing with lights sometimes you never know how many you might need and if you don't have enough, well you still have the sun to help you. For these photos I had two SB800 but, to achieve the desired effect I needed an extra help.

No "moving" reflector has been used for
this shot
First of all let’s see how I organized the table. I have a squared piece of glass sitting on top of four plastic cups to separate it from the base. Under the glass there is one SB800 with a red gel, above the glass we have the Molix' Finder 110 sprayed with water. Off camera right slightly above the subject is the other SB800 through a translucent umbrella, while the window of the room is opened and its position is again on camera right.


Here we are using the "moving" reflector
but the SB800 with the red gel has been turned off
On camera left a friend is holding a silver reflector with a bit of a hammered surface; is not flat and smooth and it works better for what I want to achieve. The exposure time is 2 seconds, enough to be able to play with the light coming from the window and mix it with the speedlights.


Shot taken with the setting described in
the post
When I take the shot my friend is moving the reflector for the 2 seconds of the exposure and the light coming from the uneven silver surface paints some sort of “blurred” background with liquid lights and shadows while the product has been perfectly lit by the SB800. The water sitting on the glass surface also helps achieving this result but as you can see in the three shots, the difference really pops out.


It is very exciting for me to always explore new ways of lighting a product, the studio gives you so many different opportunities and the subjects never complain J I hope this give you some ideas for your studio work and if you think of a way to improve it your comments are always welcome.

Monday, December 12, 2011

Putting the lights within the frame. Sculpo crankbait by Molix, studio shot

Molix Sculpo lure. Studio shot with three lights by Nicola Zingarelli

One of the simple rules I have understood in this photography business is that eventually there are NO RULES!

I have seen some cool images of guys putting their lights within the frame and for this reason I decided to try the same in one of my studio shots. What I wanted to reply, in a way more reduced scale, were the stadium or stage lights, all pointed to the subject that is the center of attention.

To achieve that I had to work on a table longer than usual and using a wider lens, otherwise I would have either missed the two SB800 that you can see in the frame, or too close to the subject with serious problems, at least for me, to control the light. In my first attempts I only used the two visible light, but even though the lure is translucent I was missing a good deal of light on it. After several try with reflectors I had to pick up a third light, Metz 58, and use it at its lowest power with a tight zoom and a grid to make the Sculpo pop up.

The result is in front of your eyes, I love the lights in the background even though I would have love them showing a "star" instead of the rectangular shape of the SB800, and I would have loved the product to be a bit bigger but I think I can work that out a bit.

If anybody has an idea of how to improve this kind of images please feel free to drop a comment either in the blog or in Flickr, I'd highly apreciate.

Sunday, January 2, 2011

Lights and metal

The general opinion is that is very difficult to light metal properly. The light bounces all over the place and highlights can become a nightmare. Anyway, here's the result of my latest studio work with the new Accurate reels that i just received. Many shots of details and some full reel body.
This is the technical list
2 X SB800 speedlights triggered with CLS
One speedlight through Lastolite EzyBox
One Speedlight through Orbis Ring Flash
One white reflector

Nikon D90 with Tokina 100mm f2.8 Macro
Black Vinyl background
Water spray
Detail of the spool and the body of the reel

Detail of the drag lever and drag preset

Side plate with accucast knob
Side plate with strike limit
Side plate with "lefty" sing for reels with left handle
Knob handle
The whole reel
Whole reel sprayed with water and with a Theos jig on one side

Monday, December 20, 2010

Macro shots of products with a Fisheye lens

I’ve been thinking for a while about doing some macro stuff with the fisheye, and today I finally gave it a try. I have a Nikkor 10.fmm f2.8 fisheye lens that I really love. I don’t use it as much as I would because it the pictures tend to get tiring, but every once in a while it comes handy when doing some fishing portraits or landscapes.

This is quite an interesting result.
Not many people know that this lens can focus at a distance of…. I don’t know exactly but basically, you can rub the lens against the subject, as I proved once again today. You can then imagine how special of a macro lens can be. Everything is dramatically distorted; distance between foreground and background absolutely exaggerated, and quite some problems not get in between the light and what you are shooting

Still something that at least will make you smile
Well, if I can be let's say at 2cm from the subject, and have a softbox on top of me or slightly facing towards me, I will have to do some magic trick not to have the shadow of the camera, or my head, covering half of my product. Another issue is how to trigger the flash with the CLS. If I’m under the softbox, it is quite difficult that the sparkle of the pop up on my Nikon can be seen by the SB800 remote unit that is covered by the softbox itself. I leant it today the hard way.

Here we are getting worst, nothing really interesting about it
To find a solution I had to pull the good old’ remote cable and trigger the flash with that one, while putting the other flash in slave. Too bad my chord is so short that the softbox, most of the times, was falling on top of myself and the product. 
Anyway, when I started shooting the lure I had the confirmation that another of my fear was being confirmed. The background, for as wide and tall as it could be, was not enough to cover the 180º vision of the lens. Fortunately is not big deal because the light was quite dim and at 1/200sec and f9 everything turned almost dark (and I had room to further darken it in Lightroom).

Help me say: UGLY!
So I had my happy shooting with the 10.5mm Fisheye, and the results can be seen here, some fun even interesting, some plain awful. I will give it a try again in the future, but I have to work a bit on some details, especially lighting, which can be tricky. For these shots I had my two SB800 through a Lastolite Softbox III on camera left, and an Orbis Ring Flash on camera right

Monday, December 13, 2010

Yellow daisy shot using a Orbis Ring Flash in the background and a Lumiquest Softbox III as main light


Today I had to take some studio shots and at the end of the session I stole one of my wife's flowers and had some fun. While taking some pictures of it with the Orbis Ring Flash I had the idea of using that very light modifier as a background, centering the flower in the black hole that is commonly used to stick the lens.
The how-to... Lumiquest Softbox III
on camera left, Orbis Ring Flash
as background

I adjusted the camera on the tripod to have the flower exactly in the middle of the black hole and did few test shots. The ide was cool but I needed an extra light to bring up the flower a bit. All that backlight couldn't do it by itself.
So I added an extra SB800 with a Lumiquest Softbox III and..voilá

Sunday, November 14, 2010

Light trails

There are amazing things that can be done using your camera’s slow shutter speed properly; one of them is taking pictures of car light trails. What you need is pretty basic: camera, lens, tripod, maybe a graduate filter and a remote control to release your shutter when you are in “bulb” mode, or at least you need it if you own a Nikon. I like these images especially when is not 100% dark, in fact at twilight you get the best colour of the sky, far from being black it turns into an amazing blue. Put your camera on the tripod and secure it properly, compose your scene. Take an exposure reading of the ambient light; let not the car’s lights fool your meter into underexposing the scene. The light will be burned anyway, and that’s what it is, just light that will decorate your scene.

If you need to balance the sky use a grad filter but I don’t think you will need it unless you have a strong backlit image with the sun too high. Now, I assume that if you are like me you are in manual exposure; if not maybe you should try. A (aperture) is ok too, but you will need to compensate the exposure through the exposure compensation button, hence in manual will probably be faster. If your shutter speed is within the 30 you will probably be able to use the self timer to trigger the camera, but if you have very little light and need to go over 30” you will need to put your shutter speed to “bulb” and then you will only be able to take the shot using the remote control (no worries, is not an expensive gimmick).

When everything is set, with your ISO as low as you can, the lens clean to reduce the problems with flare, and the tripod well set you start shooting, Most of the times is a trial and error business, until you find the right light and the right “traffic” to get the image you need.

Monday, July 5, 2010

Metal Still Life

I studied THE BOOK “Light, Science and Magic” trying to understand the big deal of the Family of angles. Reflected and diffused light and did a bit of experiments

Using a black vinyl background and a metal lure can be a dangerous combination. I needed to keep the background black and make the lures shine, with a bit of reflection on the glossy plastic.

To achieve such result I used a combination of two lights, SB800 of course. One is bouncing the light off a big Lastolite 40” Umbrella box and the other one has an Orbis Ring Flash with it. Both light triggered with Nikon CLS.

First of all I made a sticky ball with duct tape to lift the jigs from the bottom. I put it in the back in order to achieve a bit of angle, reflect the light and show the length, height and width. Then I poured few drops of water to get more reflecting surface and decorate the image.
The Umbrella Box was placed 90º with the table. By doing so I had the light reflecting against the jigs but not the background that remained black. On the back of the jigs I had the other flash with the Orbis Ring to bring up the shadows a bit

Honestly, I love these still lives and will keep experimenting

Thursday, May 13, 2010

Three Books for the Lighting enthusiasts

If you're a lighting fanatic I got three books to suggest you. I red them all, they are quite easy to understand, bring a lot of solutions, ideas and practical tips, and sure teach you one thing or two about lights. Any kind of light. The author is Kirk Tuck, a photographer based in Austin, Texas, who has a great degrees of knowledge about what he does: working with lights.

Have a good reading!

Saturday, December 19, 2009

The Dark Session

The use of artificial light is, as the followers of this blog know, very high on my list. I got absolutely hooked by the use of strobes, speed lights and studio light, especially after becoming a follower of the Strobist community myself.

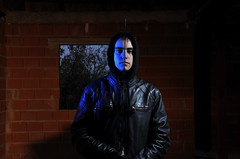
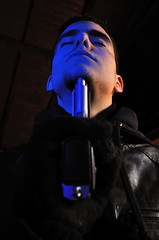
The problem is to find models, I mean, patient people who don’t mind being around with an obsessed guy who take strange pictures of them. Randomly, a member of the family gets involved in the task. Poor soul, he knows when we start but never knows when it all finish. This time it was my nephew’s time. 18 years old, rock music lover and with a light beard showing in his chin, perfectly matched with a dark hooded sweater.

We did the session inside a house in construction. We started close to sunset and finished when it was dark and I had to work my way through things with a portable lamp. Three lights: two Metz and one Nikon SB800. Elinchrom Skyport triggers. Manfrotto Nano Stands, translucent umbrella and a Honlphoto grid. These are my tools, together with the Nikon D90 and the 18-200VR lens.

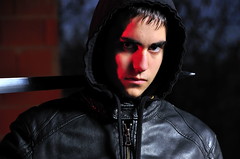
We worked around different kind of situations, mostly based around the idea of the dark warrior or something alike. One light was taking care of the background, both from a bare Metz 48 or through a translucent umbrella. The kicker light, that for me somehow is the main light, or at least the one that takes care of giving the image “that feeling”, is on camera left coming from a SB800 gelled blue or red with a Honlphoto grid. On camera right we have a Metz 58 through a translucent umbrella.

The result is mixed. There’s so much to learn about lights and their fine tuning that I can’t expect major improvement overnight, yet a couple of these images make me happy and proud. The most disappointing is probably the third one, where the light coming from the umbrella is too strong and kills a bit of the atmosphere.

If you need any info about the setup don’t hesitate to contact me.

Tuesday, September 15, 2009

A good man in an evil world

Life is strange, and this is one of the main reason why is worth living it as deep as you can. One day you’re trashed, work sucks, had an argue with your wife, and the following day somebody rings at your door and a big box is handed to you.

You know who’ve sent you the box, is a friend down in Andalusia, he called you the day before to let you know that something would come, but you don’t have a clue of what is inside the box. The BIG box, I should say, and is heavy.

The phone rings, you leave the package in the hall and answer. Blah, blah, blah, hang up. Damn! Lots of e-mails coming, you start opening them and replying. The box sits there waiting for you. Finally things get back to normal and you can resume your unpacking.

What the hell is this? A big bag shows inside the box and is quite heavy. You start pulling it from the cardboard parcel and you can read on one side “Starblitz”. A bell rings. Your dormant brain cannot realize straight away but you have a hint. Then...is light! Beat me; Starblitz is a lighting equipment maker so this must be a studio lighting kit or something like this.

The bag’s zip slides too slow compared to my heartbeat, but when I finally manage to open it every doubt disappear. It truly is a Studio Lighting Kit (Starblitz DI 160) with 3 lights, 2 soft boxes, one translucent umbrella, 3 stands, 1 radio trigger/receiver and the comfortable and handy bag.

Cannot believe it. During the last few weeks I have been browsing the various options to put together a studio light set and all of a sudden, without knowing my thoughts somebody has the idea to buy it for me.

Paquito, thank you very much, this is THE GIFT, one of the few things that in this very moment I could have asked for and really wanted to have.

If you’re a good human being, and I think I belong to this league, those you pick as your friends are good too and things like this can happen. Yes, I’m a lucky bastard!

I’ll be posting some pictures shot with the kit soon.